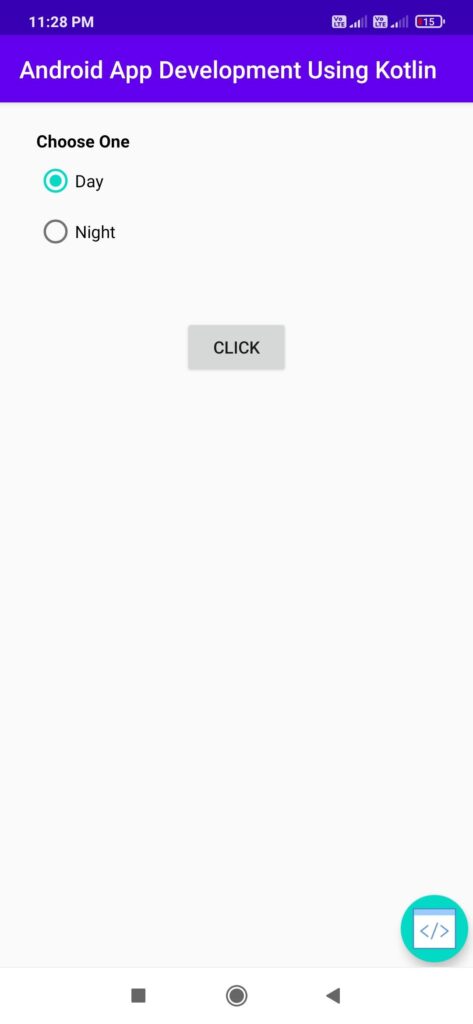
Radio Button Example in kotlin
Hello android developer, today I will learn how to use radio example button using kotlin with a basic example. RadioButton is a widget that can allow the android user to select any one option at a time. Android Radio button as two state checked or unchecked. Radio button mainly used to select a single option from a list.
this article will help you how to create a RadioButton in kotlin language using Android Studio. By default Radiobutton in Unchecked (OFF) state. if user clicks a Radio button it comes in checked state.
You may know also:
Android Calculator in Kotlin Using Android Studio
Expandable List View code snippet for Android Studio
Android Studio TextSwitcher using kotlin Language
Example of Android Radio Button using Kotlin language
Follow the below step to create new android project. if you already create android project the ignore the steps.
1.Open Android Studio.
2.Now click on File, then New => New Project. Now Write Project name and select kotlin from dropdown menu and click next.
3.Now Select minimum SDK, Then click Next button.
4.Selct Empty activity and then click finish button.
if you follow this step properly then you will get a newly create project successfully.
activity_main.xml
Below is the code for activity_main.xml. Add the following code to res/layout/activity_main.xml.
|
1 2 3 4 5 6 7 8 9 10 11 12 13 14 15 16 17 18 19 20 21 22 23 24 25 26 27 28 29 30 31 32 33 34 35 36 37 38 39 40 41 42 43 44 45 46 47 48 49 50 51 52 53 |
<RelativeLayout xmlns:android="http://schemas.android.com/apk/res/android" xmlns:tools="http://schemas.android.com/tools" android:layout_width="match_parent" android:layout_height="match_parent"> <RadioGroup android:id="@+id/radioGroup" android:layout_width="match_parent" android:layout_height="wrap_content" android:layout_alignParentTop="true" android:layout_marginLeft="30dp" android:layout_marginTop="49dp" android:gravity="center"> <RadioButton android:id="@+id/Day" android:layout_width="match_parent" android:layout_height="wrap_content" android:text="Day" /> <RadioButton android:id="@+id/Night" android:layout_width="match_parent" android:layout_height="wrap_content" android:layout_marginTop="10dp" android:text="Night" /> </RadioGroup> <Button android:id="@+id/button" android:layout_width="wrap_content" android:layout_height="wrap_content" android:layout_below="@+id/radioGroup" android:layout_centerHorizontal="true" android:layout_marginTop="56dp" android:text="Click" /> <TextView android:id="@+id/text" android:layout_width="match_parent" android:layout_height="wrap_content" android:layout_alignParentTop="true" android:layout_alignStart="@+id/radioGroup" android:layout_marginTop="22dp" android:text="Choose One" android:textColor="@android:color/black" android:textStyle="bold" /> </RelativeLayout> |
MainActivity.kt
below kotlin code for MainActivity.kt.
|
1 2 3 4 5 6 7 8 9 10 11 12 13 14 15 16 17 18 19 20 21 22 23 24 25 26 27 28 29 30 31 32 |
import androidx.appcompat.app.AppCompatActivity import android.os.Bundle import android.widget.Button import android.widget.RadioButton import android.widget.RadioGroup import android.widget.Toast class MainActivity : AppCompatActivity() { private var selection = "" override fun onCreate(savedInstanceState: Bundle?) { super.onCreate(savedInstanceState) setContentView(R.layout.activity_main) val radioGroup = findViewById<RadioButton>(R.id.radioGroup) as RadioGroup val btn=findViewById<Button>(R.id.button) as Button radioGroup.setOnCheckedChangeListener { group, ID -> when (ID) { R.id.Day -> { selection = "Day" } R.id.Night -> { selection = "Night" } } } btn.setOnClickListener { if(selection.isEmpty()) Toast.makeText(this@MainActivity,"Please Select Any One",Toast.LENGTH_LONG).show() else Toast.makeText(this@MainActivit ,"You have Selected "+selection,Toast.LENGTH_LONG).show() } } } |
Congratulations! You have completed your basic Radio Button app using kotlin language. Now Run the app using the emulator. you will get output as shown below.
download source code from github


