
Android Calculator in Kotlin Using Android Studio
Hello Developer, In this tutorial, we will learn how to create an android calculator using Kotlin language in android studio full tutorial with code. using this code you can create your won calculator application in android studio using Kotlin language. This calculator app can perform basic arithmetic operations like multipication , addition, subtraction, or division.
And if you want to know how to create an android calculator app using java programming language the read my previous article. This is a basic calculator app with limited functionality. follow our tutorial to make a simple calculator app in android studio using Kotlin language.
The buttons included should be:
- Number Keys: “0”,”1″,”2″,”3″,”4″,”5″,”6″,”7″,”8″,”9″.
- Operation Keys: “+”, “-”, “*”, “/”.
- Other Keys: “=”, “CLEAR”.
For this calculator app we require some element.
- Button
- TextView
TextView : TextVIew we use to show user input number ,operations and also display the result.
Button : use to input value from 0 – 9 , input operations and some other use to calculate value and clear input.
Create a Calculator Android app using Kotlin language.
Step 1:
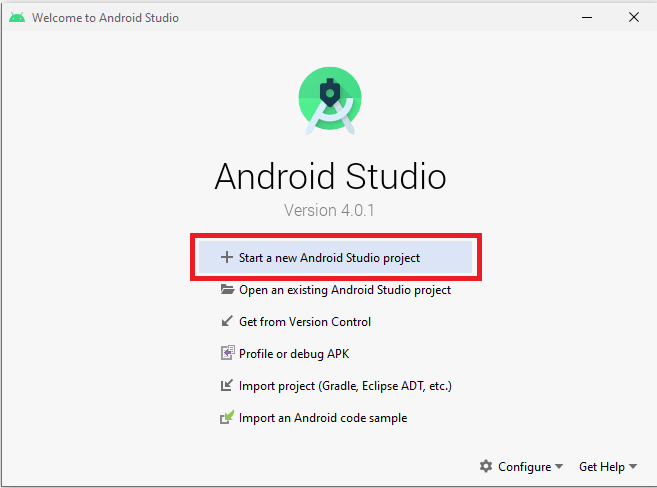
- Open Your Android Studio. and then click on start a New Android Studio Project.
- Under the Phone and Tablet tab, Select Empty Activity, and click Next button.

- Write your Project / Application Name “Calculator” and select the language as Kotlin. leave other fields blank as it is, now click on the Finish Button your project will be loaded.
Step 2:
by default it will open to file MainActivity.kt and activity_main.xml .First, we are going to create user interface of calculator app using TextView, Button and Button.
- Now, first open the activity_main.xml, from main layout file (res => layout => activity_main.xml ) this file contains the main layout of the android app, The layout code snippet is shown below. So, copy our xml codes from the below and add it to the Activity_main.xml file in your project.
Activity_main.xml
<androidx.constraintlayout.widget.ConstraintLayout
    xmlns:android="http://schemas.android.com/apk/res/android"
       xmlns:app="http://schemas.android.com/apk/res-auto"
       xmlns:tools="http://schemas.android.com/tools"
       android:layout_width="match_parent"
       android:layout_height="match_parent"
       android:background="#DEDEDE"
       android:orientation="vertical">


    <TextView
        android:id="@+id/textView2"
        android:layout_width="wrap_content"
        android:layout_height="wrap_content"
        android:ems="10"
        android:maxLength="12"
        android:textSize="48sp"
        app:layout_constraintBottom_toTopOf="@+id/tableLayout"
        app:layout_constraintEnd_toEndOf="parent"
        app:layout_constraintStart_toStartOf="parent"
        app:layout_constraintTop_toTopOf="parent" />

    <TableLayout
        android:id="@+id/tableLayout"
        android:layout_width="match_parent"
        android:layout_height="wrap_content"
        android:gravity="fill"
        app:layout_constraintBottom_toBottomOf="parent"
        app:layout_constraintEnd_toEndOf="parent"
        app:layout_constraintStart_toStartOf="parent"
        app:layout_constraintTop_toBottomOf="@+id/textView2">

        <TableRow
            android:layout_width="match_parent"
            android:layout_height="0dp"
            android:layout_weight="1"
            android:gravity="center">

            <Button
                android:id="@+id/seven"
                android:layout_width="0dp"
                android:layout_height="match_parent"
                android:layout_weight="1"
                android:onClick="onDigit"
                android:text="7" />

            <Button
                android:id="@+id/eight"
                android:layout_width="0dp"
                android:layout_height="match_parent"
                android:layout_weight="1"
                android:onClick="onDigit"
                android:text="8" />

            <Button
                android:id="@+id/nine"
                android:layout_width="0dp"
                android:layout_height="match_parent"
                android:layout_weight="1"
                android:onClick="onDigit"
                android:text="9" />

            <Button
                android:id="@+id/divide"
                android:layout_width="0dp"
                android:layout_height="match_parent"
                android:layout_weight="1"
                android:onClick="onOperator"
                android:text="/" />
        </TableRow>

        <TableRow
            android:layout_width="match_parent"
            android:layout_height="0dp"
            android:layout_weight="1"
            android:gravity="center">

            <Button
                android:id="@+id/four"
                android:layout_width="0dp"
                android:layout_height="match_parent"
                android:layout_weight="1"
                android:onClick="onDigit"
                android:text="4" />

            <Button
                android:id="@+id/five"
                android:layout_width="0dp"
                android:layout_height="match_parent"
                android:layout_weight="1"
                android:onClick="onDigit"
                android:text="5" />

            <Button
                android:id="@+id/six"
                android:layout_width="0dp"
                android:layout_height="match_parent"
                android:layout_weight="1"
                android:onClick="onDigit"
                android:text="6" />

            <Button
                android:id="@+id/multiply"
                android:layout_width="0dp"
                android:layout_height="match_parent"
                android:layout_weight="1"
                android:onClick="onOperator"
                android:text="*" />
        </TableRow>

        <TableRow
            android:layout_width="match_parent"
            android:layout_height="0dp"
            android:layout_weight="1"
            android:gravity="center">

            <Button
                android:id="@+id/one"
                android:layout_width="0dp"
                android:layout_height="match_parent"
                android:layout_weight="1"
                android:onClick="onDigit"
                android:text="1" />

            <Button
                android:id="@+id/two"
                android:layout_width="0dp"
                android:layout_height="match_parent"
                android:layout_weight="1"
                android:onClick="onDigit"
                android:text="2" />

            <Button
                android:id="@+id/three"
                android:layout_width="0dp"
                android:layout_height="match_parent"
                android:layout_weight="1"
                android:onClick="onDigit"
                android:text="3" />

            <Button
                android:id="@+id/subtract"
                android:layout_width="0dp"
                android:layout_height="match_parent"
                android:layout_weight="1"
                android:onClick="onOperator"
                android:text="-" />
        </TableRow>

        <TableRow
            android:layout_width="match_parent"
            android:layout_height="0dp"
            android:layout_weight="1"
            android:gravity="center">

            <Button
                android:id="@+id/decimal"
                android:layout_width="0dp"
                android:layout_height="match_parent"
                android:layout_weight="1"
                android:onClick="onDecimalPoint"
                android:text="." />

            <Button
                android:id="@+id/zero"
                android:layout_width="0dp"
                android:layout_height="match_parent"
                android:layout_weight="1"
                android:onClick="onDigit"
                android:text="0" />

            <Button
                android:id="@+id/clear"
                android:layout_width="0dp"
                android:layout_height="match_parent"
                android:layout_weight="1"
                android:onClick="onClear"
                android:text="CLR" />

            <Button
                android:id="@+id/add"
                android:layout_width="0dp"
                android:layout_height="match_parent"
                android:layout_weight="1"
                android:onClick="onOperator"
                android:text="+" />
        </TableRow>

        <TableRow
            android:layout_width="match_parent"
            android:layout_height="0dp"
            android:layout_weight="1">

            <Button
                android:id="@+id/equal"
                android:layout_width="0dp"
                android:layout_height="match_parent"
                android:layout_weight="1"
                android:onClick="onEqual"
                android:text="=" />
        </TableRow>
    </TableLayout>

</androidx.constraintlayout.widget.ConstraintLayout>
we have designed the User interface. now, we will add some code to the MainActivity.kt so that our app work like a real calculator.Now, open the MainActivity.kt file (src -> package -> MainActivity.kt) in MainActivity.kt, copy and paste the code of kotlin programming given below, which is the backend language.
MainActivity.kt
import androidx.appcompat.app.AppCompatActivity
import android.os.Bundle
import android.view.View
import android.widget.Button
import android.widget.TextView
import net.objecthunter.exp4j.ExpressionBuilder

class MainActivity : AppCompatActivity() {

    lateinit var outputTextView: TextView
    var lastNumaric: Boolean= false
    var stateError: Boolean = false
    var lastDot :Boolean=false
    override fun onCreate(savedInstanceState: Bundle?) {
        super.onCreate(savedInstanceState)
        setContentView(R.layout.activity_main)
    }

    fun onDigit(view: View)
    {
        if(stateError)
        {
            outputTextView.text=(view as Button).text
            stateError=false
        }else {
            outputTextView.append((view as Button).text)
        }
        lastNumaric=true
    }

    fun onDecimalPoint(view: View)
    {
        if(lastNumaric && !stateError && !lastDot)
        {
            outputTextView.append(".")
            lastNumaric=false
            lastDot=true
        }
    }

    fun onOperator (view: View)
    {
        if(lastNumaric && !stateError)
        {
            outputTextView.append((view as Button).text)
            lastNumaric=false
            lastDot=false
        }
    }


    fun onClear(view: View)
    {
        this.outputTextView.text= ""
        lastNumaric=false
        stateError=false
        lastDot=false
    }
    fun onEqual(view: View)
    {

        if(lastNumaric && !stateError)
        {
            val text = outputTextView.text.toString()
            val expression= ExpressionBuilder(text).build()
            try
            {
                val result= expression.evaluate()
                outputTextView.text= result.toString()
                lastDot=true
            }catch (ex:Exception)
            {
                outputTextView.text="Error"
                stateError=true
                lastNumaric=false
            }
        }

    }


}
Congratulations! You have completed your basic calculator app using kotlin language. Now Run the app using the emulator
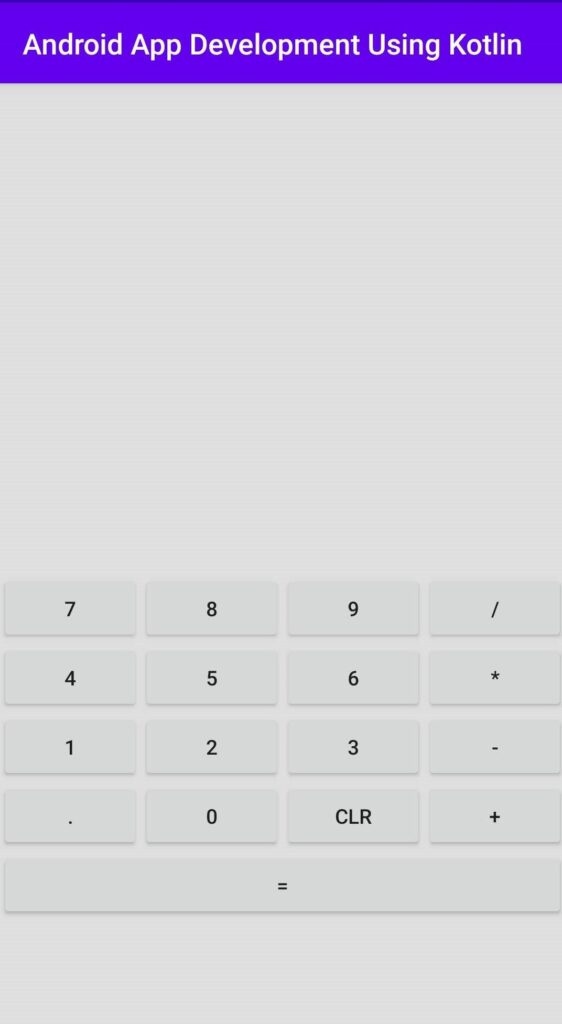
Our calculator app is running perfectly fine. Here some Screenshot.
This is how Basic Calculator app look like.


Summary
So in this android tutorial, we have learned how to create a simple calculator app using kotlin language in android studio. if you are a beginner then this tutorial good for you. because this project will help you to improve your skill. if you like our tutorial then share this article with your good friends.