Checkbox code for Android Studio
Welcome. Here in this tutorial you will learn how to use checkbox in Android Studio.
Checkbox Example for Android Studio
In Android Studio, a checkbox is a type of button that is either checked or unchecked. It acts like an on off switch. It can be used when you have many options available and the user has to select from list of available options. Usually check-boxes are displayed in a vertical list. A very common example of checkbox in any android app is the Remember Me option.
Adding Checkbox in Android App
You can add Checkbox through the XML layout by using the <CheckBox> tag.
|
1 2 3 4 5 |
<CheckBox android:id="@+id/Mumbai" android:layout_width="wrap_content" android:layout_height="wrap_content" android:text="Mumbai"> |
You can also add other attributes to your Checkbox like gravity, textColor, textSize, textStyle, background, padding, etc. They will work the same as they do inside other UI elements.
You can also check the present condition of a check box automatically by utilizing isChecked() function. It returns output as true when the checkbox is checked and returns false if the checkbox is not selected. The java code for example is shown below which demonstrates how to work with check-boxes.
|
1 2 3 4 5 |
CheckBox Mumbai=(CheckBox) findViewById(R.id.Mumbai); if(Mumbai.isChecked()) { strMessage="Mumbai "; } |
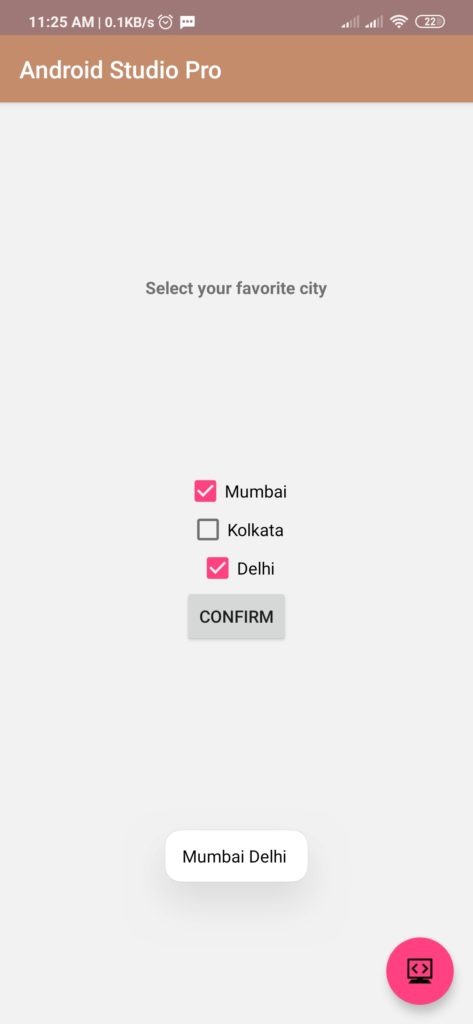
An image is shown below for example purpose. It shows three check-boxes and displays text as name of the check-boxes that are selected.
The Full Java Code along with the XML layout for the above example is shown below:-
- First Create a new project in Android Studio
- File ⇒ New Android ⇒ Application Project
- Then Open src -> package -> MainActivity.java and then add following code :
JAVA (MainActivity.java)
|
1 2 3 4 5 6 7 8 9 10 11 12 13 14 15 16 17 18 19 20 21 22 23 24 25 26 27 28 29 30 31 32 33 34 35 36 37 38 39 40 41 42 43 44 45 46 47 48 49 50 51 52 |
import android.support.v7.app.AppCompatActivity; import android.os.Bundle; import android.view.View; import android.widget.CheckBox; import android.widget.Toast; public class Checkbox extends AppCompatActivity { CheckBox Mumbai; CheckBox Kolkata; CheckBox Delhi; @Override protected void onCreate(Bundle savedInstanceState) { super.onCreate(savedInstanceState); setContentView(R.layout.activity_checkbox); initialUISetup(); } public void initialUISetup() { Mumbai = (CheckBox) findViewById(R.id.Mumbai); Kolkata = (CheckBox) findViewById(R.id.Kolkata); Delhi = (CheckBox) findViewById(R.id.Delhi); } public void getHobbyClick(View v) { String strMessage = ""; if(Mumbai.isChecked()) { strMessage+="Mumbai "; } if(Kolkata.isChecked()) { strMessage+="Kolkata "; } if(Delhi.isChecked()) { strMessage+="Delhi "; } showTextNotification(strMessage); } public void showTextNotification(String msgToDisplay) { Toast.makeText(this, msgToDisplay, Toast.LENGTH_SHORT).show(); } } |
- Now Open res -> layout -> activity_main.xml and then add following code :
XML (activity_main.xml)
|
1 2 3 4 5 6 7 8 9 10 11 12 13 14 15 16 17 18 19 20 21 22 23 24 25 26 27 28 29 30 31 32 33 34 35 36 37 38 39 40 41 42 43 44 45 46 47 48 49 50 51 52 53 54 55 56 57 58 59 60 61 62 63 64 65 66 67 68 69 70 71 |
<android.support.constraint.ConstraintLayout xmlns:android="http://schemas.android.com/apk/res/android" xmlns:app="http://schemas.android.com/apk/res-auto" xmlns:tools="http://schemas.android.com/tools" android:background="#F2F2F2" android:orientation="vertical" android:layout_width="fill_parent" android:layout_height="fill_parent" tools:context=".Checkbox"> <CheckBox android:id="@+id/Mumbai" android:layout_width="wrap_content" android:layout_height="wrap_content" android:text="Mumbai" app:layout_constraintBottom_toTopOf="@+id/Kolkata" app:layout_constraintEnd_toEndOf="parent" app:layout_constraintStart_toStartOf="parent" app:layout_constraintTop_toBottomOf="@+id/button1"> </CheckBox> <CheckBox android:id="@+id/Kolkata" android:layout_width="wrap_content" android:layout_height="wrap_content" android:text="Kolkata" app:layout_constraintBottom_toTopOf="@+id/Delhi" app:layout_constraintEnd_toEndOf="parent" app:layout_constraintStart_toStartOf="parent" app:layout_constraintTop_toBottomOf="@+id/Mumbai"> </CheckBox> <CheckBox android:id="@+id/Delhi" android:layout_width="wrap_content" android:layout_height="wrap_content" android:text="Delhi" app:layout_constraintBottom_toTopOf="@+id/button1" app:layout_constraintEnd_toEndOf="parent" app:layout_constraintStart_toStartOf="parent" app:layout_constraintTop_toBottomOf="@+id/Kolkata"> </CheckBox> <Button android:id="@+id/button1" android:layout_width="wrap_content" android:layout_height="wrap_content" android:layout_marginBottom="8dp" android:onClick="getHobbyClick" android:text="Confirm" app:layout_constraintBottom_toBottomOf="parent" app:layout_constraintEnd_toEndOf="parent" app:layout_constraintStart_toStartOf="parent" app:layout_constraintTop_toBottomOf="@+id/Delhi"> </Button> <TextView android:id="@+id/textView" android:layout_width="wrap_content" android:layout_height="wrap_content" android:text="Select your favorite city" android:textStyle="bold" app:layout_constraintBottom_toTopOf="@+id/Mumbai" app:layout_constraintEnd_toEndOf="parent" app:layout_constraintStart_toStartOf="parent" app:layout_constraintTop_toTopOf="parent" /> </android.support.constraint.ConstraintLayout> |
Output:
Finally, run this project.
This is how Android Checkbox looks like.
You can directly copy paste these snippets to your android studio, and they should work perfectly. Just save and run your project. You can also try to play with these checkbox options on your own and see the corresponding changes accordingly. There are a variety of properties available which can be changed to make your checkbox more usable and modern looking.
For a more detailed guide, you can also visit android’s official guide below:-
https://developer.android.com/guide/topics/ui/controls/checkbox.html
Comment down below if you are facing any problems.


