Date Picker code example for Android Studio
Welcome. Here in this tutorial you will learn how to Date Picker in Android Studio.
Date Picker Example for Android Studio
A date picker is an UI element in android studio that allows you to pick date,month and year. You can make use of calendar and pick date from a calendar style view which is more user-friendly.
For that purpose, we will use the DatePickerDialog and the Calendar class in Android Studio. The code is given below:-
|
1 2 3 4 5 6 7 8 9 10 11 12 13 14 15 16 |
DatePickerDialog datePicker; Calendar calendar; TextView datetext; calendar = Calendar.getInstance(); year = calendar.get(Calendar.YEAR); month = calendar.get(Calendar.MONTH); dayOfMonth = calendar.get(Calendar.DAY_OF_MONTH); datePicker = new DatePickerDialog(DatePicker.this,new DatePickerDialog.OnDateSetListener() { @Override public void onDateSet(android.widget.DatePicker datePicker, int year, int month, int day) { datetext.setText(day + "/" + (month + 1) + "/" + year); } }, year, month, dayOfMonth); datePicker.show(); |
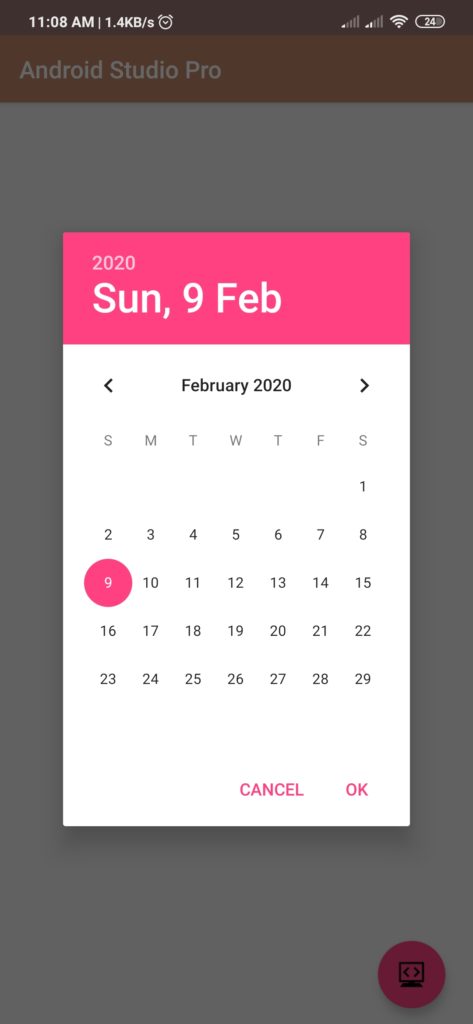
The above code will implement the date picker to pick the date and will display the date as text in the textview named datetext.
An image is shown below which demonstrates a date picker in action:-
The Full Java Code along with the XML layout for the above example is shown below:-
- First Create a new project in Android Studio
- File ⇒ New Android ⇒ Application Project
- Then Open src -> package -> MainActivity.java and then add following code :
JAVA (MainActivity.java)
|
1 2 3 4 5 6 7 8 9 10 11 12 13 14 15 16 17 18 19 20 21 22 23 24 25 26 27 28 29 30 31 32 33 34 35 36 37 38 39 40 41 42 43 44 45 |
import android.app.DatePickerDialog; import android.support.v7.app.AppCompatActivity; import android.os.Bundle; import android.view.View; import android.widget.Button; import android.widget.TextView; import java.util.Calendar; public class DatePicker extends AppCompatActivity { Button Date; TextView date; DatePickerDialog datePicker; int year; int month; int dayOfMonth; Calendar calendar; @Override protected void onCreate(Bundle savedInstanceState) { super.onCreate(savedInstanceState); setContentView(R.layout.activity_date_picker); Date = findViewById(R.id.btnDate); date = findViewById(R.id.tvSelectedDate); Date.setOnClickListener(new View.OnClickListener() { @Override public void onClick(View view) { calendar = Calendar.getInstance(); year = calendar.get(Calendar.YEAR); month = calendar.get(Calendar.MONTH); dayOfMonth = calendar.get(Calendar.DAY_OF_MONTH); datePicker = new DatePickerDialog(DatePicker.this,new DatePickerDialog.OnDateSetListener() { @Override public void onDateSet(android.widget.DatePicker datePicker, int year, int month, int day) { date.setText(day + "/" + (month + 1) + "/" + year); } }, year, month, dayOfMonth); datePicker.show(); } }); } } |
- Now Open res -> layout -> activity_main.xml and then add following code :
XML (activity_main.xml)
|
1 2 3 4 5 6 7 8 9 10 11 12 13 14 15 16 17 18 19 20 21 22 23 24 25 26 27 28 29 30 |
<RelativeLayout xmlns:android="http://schemas.android.com/apk/res/android" xmlns:tools="http://schemas.android.com/tools" android:layout_width="match_parent" android:layout_height="match_parent" android:background="#F2F2F2" tools:context=".DatePicker"> <Button android:id="@+id/btnDate" android:layout_width="wrap_content" android:layout_height="wrap_content" android:layout_centerHorizontal="true" android:layout_centerVertical="true" android:background="#53bA3A" android:padding="10dp" android:text="Select a date" android:textColor="@android:color/white" /> <TextView android:id="@+id/tvSelectedDate" android:layout_width="wrap_content" android:layout_height="wrap_content" android:layout_below="@+id/btnDate" android:layout_centerHorizontal="true" android:layout_centerVertical="true" android:layout_marginTop="10dp" android:textColor="@color/colorPrimary" android:textSize="30sp" android:textStyle="italic|bold" /> </RelativeLayout> |
Output:
Finally, run this project.
This is how Date Picker code example
You can directly copy paste these snippets to your android studio, and they should work perfectly. Just save and run your project. You can also try to play with other date picker settings on your own and see the corresponding changes accordingly. There are a variety of properties available which can be changed to make a custom date picker for your android app.
For a more detailed guide, you can also visit android’s official guide below:-
https://developer.android.com/reference/android/widget/DatePicker
With this we came to an end of our tutorial. Comment down below if you are facing any problems.


